1. 背景介绍
Spring现在几乎已经成为了Java开发的必备框架,在享受Spring框架本身强大能力的同时,有时我们也会希望自己研发的组件和Spring进行整合,从而使得组件更易于上手,而且配合Spring使用能发挥更强大的作用。
Apollo配置中心的Java客户端在前一段时间也提供了和Spring整合的功能,详细代码改动可以参考PR543。
Apollo既支持传统的基于XML的配置,也支持目前比较流行的基于Java的配置。下面就以Apollo为例,简单介绍一下扩展Spring的几种方式。
2. 基于XML配置的扩展
相信从事Java开发有一些年头的人一定会对Spring的xml配置方式非常熟悉。不管是bean的定义,还是Spring自身的配置,早期都是通过xml配置完成的。相信还是有一大批遗留项目目前还是基于xml配置的,所以支持xml的配置方式是一个必选项。
2.1 定义schema
要支持XML的配置方式,首先需要定义一套XML Schema来描述组件所提供的功能。
Apollo提供了向Spring Property Sources注入配置的功能,所以schema中就需要描述我们期望用户提供的namespace以及namespace之间的排序等元数据。
下面就是Apollo的schema示例,可以看到xml的配置节点名字是config,并且有两个可选属性:namespaces和order,类型分别是string和int。
<?xml version="1.0" encoding="UTF-8" standalone="no"?>
<xsd:schema xmlns="http://www.ctrip.com/schema/apollo"
            xmlns:xsd="http://www.w3.org/2001/XMLSchema"
            targetNamespace="http://www.ctrip.com/schema/apollo"
            elementFormDefault="qualified"
            attributeFormDefault="unqualified">

    <xsd:annotation>
        <xsd:documentation><![CDATA[ Namespace support for Ctrip Apollo Configuration Center. ]]></xsd:documentation>
    </xsd:annotation>

    <xsd:element name="config">
        <xsd:annotation>
            <xsd:documentation>
                <![CDATA[ Apollo configuration section to integrate with Spring.]]>
            </xsd:documentation>
        </xsd:annotation>
        <xsd:complexType>
            <xsd:attribute name="namespaces" type="xsd:string" use="optional">
                <xsd:annotation>
                    <xsd:documentation>
                        <![CDATA[
                            The comma-separated list of namespace names to integrate with Spring property sources.
                            If not specified, then default to application namespace.
                        ]]>
                    </xsd:documentation>
                </xsd:annotation>
            </xsd:attribute>
            <xsd:attribute name="order" type="xsd:int" use="optional">
                <xsd:annotation>
                    <xsd:documentation>
                        <![CDATA[
                            The order of the config, default to Ordered.LOWEST_PRECEDENCE, which is Integer.MAX_VALUE.
                            If there are properties with the same name in different apollo configs, the config with smaller order wins.
                        ]]>
                    </xsd:documentation>
                </xsd:annotation>
            </xsd:attribute>
        </xsd:complexType>
    </xsd:element>
</xsd:schema>
2.2 创建NamespaceHandler
除了XML Schema,我们还需要创建一个自定义的NamespaceHandler来负责解析用户在XML中的配置。
2.2.1 继承NamespaceHandlerSupport
为了简化代码,我们一般会继承一个helper类:NamespaceHandlerSupport,然后在init方法中注册处理我们自定义节点的BeanDefinitionParser。
下面的示例告诉Spring由我们自定义的的BeanParser来处理xml中的config节点信息。
public class NamespaceHandler extends NamespaceHandlerSupport {
  @Override
  public void init() {
    registerBeanDefinitionParser("config", new BeanParser());
  }
}
2.2.2 自定义BeanDefinitionParser
自定义的BeanDefinitionParser负责解析xml中的config节点信息,记录用户的配置信息,为后面和Spring整合做好铺垫。
Apollo的自定义BeanDefinitionParser主要做了两件事情:
- 记录用户配置的namespace和order
- 向Spring注册Bean:
ConfigPropertySourcesProcessor,这个bean后面会实际处理用户配置的namespace和order,从而完成配置注入到Spring中的功能
public class BeanParser extends AbstractSingleBeanDefinitionParser {
  @Override
  protected Class<?> getBeanClass(Element element) {
    return ConfigPropertySourcesProcessor.class;
  }

  @Override
  protected boolean shouldGenerateId() {
    return true;
  }

  @Override
  protected void doParse(Element element, BeanDefinitionBuilder builder) {
    String namespaces = element.getAttribute("namespaces");
    //default to application
    if (Strings.isNullOrEmpty(namespaces)) {
      namespaces = ConfigConsts.NAMESPACE_APPLICATION;
    }

    int order = Ordered.LOWEST_PRECEDENCE;
    String orderAttribute = element.getAttribute("order");

    if (!Strings.isNullOrEmpty(orderAttribute)) {
      try {
        order = Integer.parseInt(orderAttribute);
      } catch (Throwable ex) {
        throw new IllegalArgumentException(
          String.format("Invalid order: %s for namespaces: %s", orderAttribute, namespaces));
      }
    }
    PropertySourcesProcessor.addNamespaces(NAMESPACE_SPLITTER.splitToList(namespaces), order);
  }
}
2.3 注册Spring handler和Spring schema
基于XML配置扩展Spring的主体代码基本就是上面这些,剩下的就是要让Spring解析xml配置文件的过程中识别我们的自定义节点,并且转交到我们的NamespaceHandler处理。
2.3.1 META-INF/spring.handlers
首先需要在META-INF目录下创建一个spring.handlers文件,来配置我们自定义的XML Schema Namespace到我们自定义的NamespaceHandler映射关系。
http\://www.ctrip.com/schema/apollo=com.ctrip.framework.apollo.spring.config.NamespaceHandler
注意,:需要转义
2.3.2 META-INF/spring.schemas
我们还需要在META-INF目录下创建一个spring.schemas,来配置我们自定义的XML Schema地址到实际Jar包中的classpath映射关系(避免Spring真的去服务器上下载不存在的文件)。
为了简单起见,Apollo把实际的schema文件放在了META-INF目录下。
http\://www.ctrip.com/schema/apollo-1.0.0.xsd=/META-INF/apollo-1.0.0.xsd
http\://www.ctrip.com/schema/apollo.xsd=/META-INF/apollo-1.0.0.xsd
注意,:需要转义
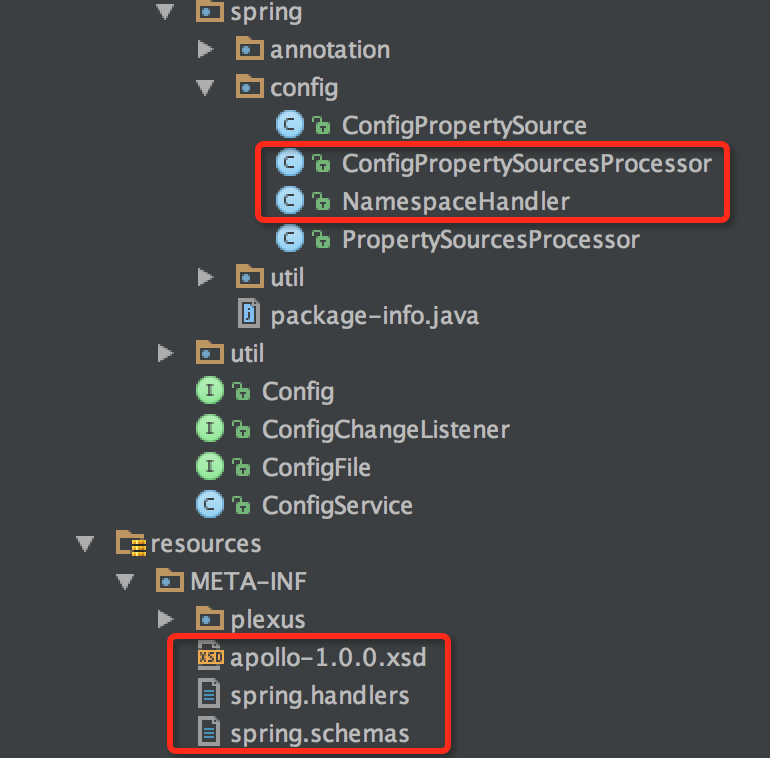
2.4 样例目录结构
按照上面的方式,最终Apollo和Spring整合的相关代码结构如下图所示:
2.5 使用样例
基于XML配置的使用样例如下:
<?xml version="1.0" encoding="UTF-8"?>
<beans xmlns="http://www.springframework.org/schema/beans"
       xmlns:xsi="http://www.w3.org/2001/XMLSchema-instance"
       xmlns:apollo="http://www.ctrip.com/schema/apollo"
       xsi:schemaLocation="http://www.springframework.org/schema/beans http://www.springframework.org/schema/beans/spring-beans.xsd
       http://www.ctrip.com/schema/apollo http://www.ctrip.com/schema/apollo.xsd">

    <apollo:config namespaces="application" order="1"/>

</beans>
3. 基于Java配置的扩展
从Spring 3.0开始,一种新的基于Java的配置方式出现了。
通过这种方式,我们在开发Spring项目的过程中再也不需要去配置繁琐的xml文件了,只需要在Configuration类中配置就可以了,大大的简化了Spring的使用。
另外,这也是Spring Boot默认的配置方式,所以建议也支持这一特性。
3.1 @Import注解
支持Java配置扩展的关键点就是@Import注解,Spring 3.0提供了这个注解用来支持在Configuration类中引入其它的配置类,包括Configuration类, ImportSelector和ImportBeanDefinitionRegistrar的实现类。
我们可以通过这个注解来引入自定义的扩展Bean。
3.2 自定义注解
和基于XML配置类似的,我们需要提供给用户一个注解来配置需要注入到Spring Property Sources的namespaces和order。
下面就是Apollo提供的@EnableApolloConfig注解,允许用户传入namespaces和order信息。
@Retention(RetentionPolicy.RUNTIME)
@Target(ElementType.TYPE)
@Documented
@Import(ApolloConfigRegistrar.class)
public @interface EnableApolloConfig {
  /**
   * Apollo namespaces to inject configuration into Spring Property Sources.
   */
  String[] value() default {ConfigConsts.NAMESPACE_APPLICATION};

  /**
   * The order of the apollo config, default is {@link Ordered#LOWEST_PRECEDENCE}, which is Integer.MAX_VALUE.
   * If there are properties with the same name in different apollo configs, the apollo config with smaller order wins.
   */
  int order() default Ordered.LOWEST_PRECEDENCE;
}
这里的关键点是在注解上使用了@Import(ApolloConfigRegistrar.class),从而Spring在处理@EnableApolloConfig时会实例化并调用ApolloConfigRegistrar的方法。
3.3 自定义ImportBeanDefinitionRegistrar实现
ImportBeanDefinitionRegistrar接口定义了registerBeanDefinitions方法,从而允许我们向Spring注册必要的Bean。
Apollo的自定义ImportBeanDefinitionRegistrar实现(ApolloConfigRegistrar)主要做了两件事情:
- 记录用户配置的namespace和order
- 向Spring注册Bean:PropertySourcesProcessor,这个bean后面会实际处理用户配置的namespace和order,从而完成配置注入到Spring中的功能
public class ApolloConfigRegistrar implements ImportBeanDefinitionRegistrar {
  @Override
  public void registerBeanDefinitions(AnnotationMetadata importingClassMetadata, BeanDefinitionRegistry registry) {
    AnnotationAttributes attributes = AnnotationAttributes.fromMap(importingClassMetadata
        .getAnnotationAttributes(EnableApolloConfig.class.getName()));
    String[] namespaces = attributes.getStringArray("value");
    int order = attributes.getNumber("order");
    PropertySourcesProcessor.addNamespaces(Lists.newArrayList(namespaces), order);

    BeanRegistrationUtil.registerBeanDefinitionIfNotExists(registry, PropertySourcesProcessor.class.getName(),
        PropertySourcesProcessor.class);
  }
}
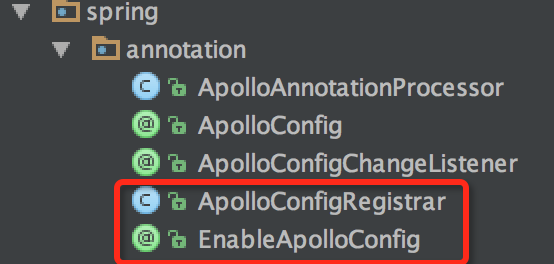
3.4 样例目录结构
按照上面的方式,最终Apollo和Spring整合的相关代码结构如下图所示:
3.5 使用样例
基于Java配置的使用样例如下:
@Configuration
@EnableApolloConfig(value = "application", order = 1)
public class AppConfig {}
4. Spring容器的扩展点
前面两节简单介绍了扩展Spring的两种方式:基于XML和基于Java的配置。通过这两种方式,我们可以在运行时收集到用户的配置信息,同时向Spring注册实际处理这些配置信息的Bean。
但这些注册进去的Bean实际上是如何工作的呢?我们通过什么方式能使我们的程序逻辑和Spring的容器紧密合作,并无缝插入到用户bean的生命周期中呢?
这里简单介绍Spring容器最常用的两个扩展点:BeanFactoryPostProcessor和BeanPostProcessor。
4.1 BeanFactoryPostProcessor
BeanFactoryPostProcessor提供了一个方法:postProcessBeanFactory。
这个方法会被Spring在容器初始化过程中调用,调用时机是所有bean的定义信息都已经加载好,但是这些bean还没有实例化。
Apollo就利用这个时间点把配置信息注入到Spring Property Sources中,从而用户的bean在真正实例化时,所有需要的配置信息已经准备好了。
public class PropertySourcesProcessor implements BeanFactoryPostProcessor {
  private static final AtomicBoolean PROPERTY_SOURCES_INITIALIZED = new AtomicBoolean(false);

  @Override
  public void postProcessBeanFactory(ConfigurableListableBeanFactory beanFactory) throws BeansException {
    if (!PROPERTY_SOURCES_INITIALIZED.compareAndSet(false, true)) {
      //already initialized
      return;
    }

    //initialize and inject Apollo config to Spring Property Sources
    initializePropertySources();
  }
}
4.3 BeanPostProcessor
BeanPostProcessor提供了两个方法:postProcessBeforeInitialization和postProcessAfterInitialization,主要针对bean初始化提供扩展。
postProcessBeforeInitialization会在每一个bean实例化之后、初始化(如afterPropertiesSet方法)之前被调用。postProcessAfterInitialization则在每一个bean初始化之后被调用。
我们常用的@Autowired注解就是通过postProcessBeforeInitialization实现的(AutowiredAnnotationBeanPostProcessor)。
Apollo提供了@ApolloConfig注解来实现实例化时注入Config对象实例,所以实现逻辑和@Autowired类似。
public class ApolloAnnotationProcessor implements BeanPostProcessor {
  @Override
  public Object postProcessBeforeInitialization(Object bean, String beanName) throws BeansException {
    Class clazz = bean.getClass();
    processFields(bean, clazz.getDeclaredFields());
    return bean;
  }

  @Override
  public Object postProcessAfterInitialization(Object bean, String beanName) throws BeansException {
    return bean;
  }

  private void processFields(Object bean, Field[] declaredFields) {
    for (Field field : declaredFields) {
      ApolloConfig annotation = AnnotationUtils.getAnnotation(field, ApolloConfig.class);
      if (annotation == null) {
        continue;
      }
      Preconditions.checkArgument(Config.class.isAssignableFrom(field.getType()),
          "Invalid type: %s for field: %s, should be Config", field.getType(), field);

      String namespace = annotation.value();
      Config config = ConfigService.getConfig(namespace);

      ReflectionUtils.makeAccessible(field);
      ReflectionUtils.setField(field, bean, config);
    }
  }
}
仔细阅读上面的代码就会发现Apollo在用户bean初始化前会根据@ApolloConfig的配置注入对应namespace的Config实例。
5. 总结
本文简单介绍了扩展Spring的几种方式,下面简单小结一下,希望对大家有所帮助:
- 通过基于XML和基于Java的配置扩展,可以使用户通过Spring使用我们研发的组件,提供很好的易用性。
- 通过Spring容器最常用的两个扩展点:
BeanFactoryPostProcessor和BeanPostProcessor,可以使我们的程序逻辑和Spring容器紧密合作,无缝插入到用户bean的生命周期中,发挥更强大的作用。
